You can add, remove, rename, and reorder the J1 FormFlow features on the appropriate campus portal pages.
Make FormFlow Available to Pages in a Tab
1. Log in to the campus portal as an administrator.
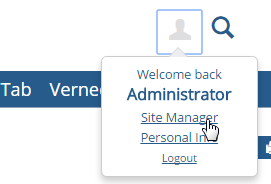
2. From the profile drop-down options, select Site Manager. Example. The Site Manager page appears.
3. From the side menu, click Tabs. A list of existing tabs appears.
4. Click
Edit
next to the tab name where your page is located.
5. Under Portlets available to pages in this tab, click the button for J1 FormFlow - Forms to toggle it to Yes.
6. Click Save at the bottom of the page. The Tabs page reappears.
7. Click Exit to portal home.
Add FormFlow to an Existing Page
1. Log in as the campus portal administrator.
2. Access the page where you want add the J1 FormFlow - Forms feature.
3. From the Admin Toolbar, click Options. The Options page appears.
4. Click Add a new feature to this page.
5. Click General Purpose features to view a list of the general purpose features.
6. Click J1 FormFlow - Forms. The Options page reappears.
7. Make any additional changes to the page name, layout or features on the page.
8. Click the Back to... link to return to the feature page.
When you choose to add the J1 FormFlow - Forms feature as its own page, it will appear as a link on the sidebar for the currently selected tab.
1. Log in as the campus portal administrator.
2. Select the tab where you want to add the feature.
3. From the side menu, click Add a Page. The Add a New Page page appears.
4. Click General Purpose features to view a list of the general purpose features.
5. Click J1 FormFlow - Forms. The J1 FormFlow - Forms page is created.
6. Make any additional changes to the page name or layout.
7. Click the Back to... link to return to the feature page.
Reorder the Features on a Page
1. Log in as the campus portal administrator.
2. Navigate to the page with J1 FormFlow.
3. From the Admin Toolbar, click Rearrange. The features on your page can now be dragged and dropped.
4. Click on, drag, and drop the features you want to move, one at a time.
5. Click Save Changes.
If you delete J1 FormFlow - Forms from a page, you will also delete any forms you created along with the submission data stored in the database for that form. The deletion cannot be undone and the data cannot be recovered. If you need to remove J1 FormFlow - Forms from a page, you can export your forms and import them into another instance of J1 FormFlow - Forms at another time.
1. Log in as the campus portal administrator.
2. Navigate to the page with J1 FormFlow.
3. From the Admin Toolbar, click Options. The Options page appears.
4. Click the link for the feature you want to remove. A confirmation window appears.
5. Click the Delete... or Stop sharing... button. If a second pop-up window appears, click the Delete button. The feature is no removed.